How To Record An Ipad Screen With Sound. Thanks to the inclusion of Screen Recording technology within iPadOS, recording the screen of your iPad is now much easier than it used to be. Previously, you had to use a separate device and paid software to record your iPad screen; now, you can record it directly from the iPad, and you can add a voiceover if desired.
Table of Contents
How to Capture Your iPad’s Screen
If you’re running iOS 11 or later on your iPad – which, given that it’s available on all iPads dating back to the fifth-generation iPad, you should be – you’ll be able to use the built-in display recording technology.
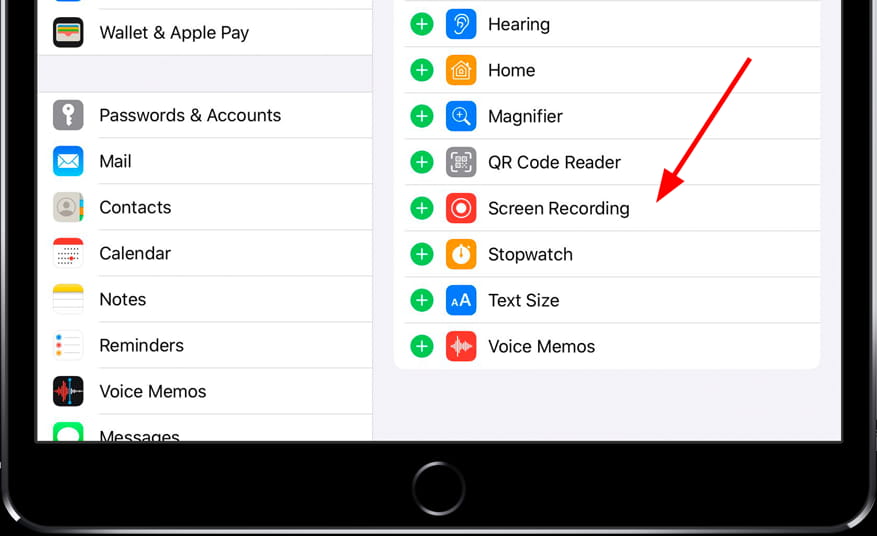
Before you can use the screen recorder feature, you must first add a toggle to your iPad’s Control Center. That’s simple; go to Settings > Control Center > Customize Controls, then tap the plus icon next to Screen Recording to add it to your quick-access controls.
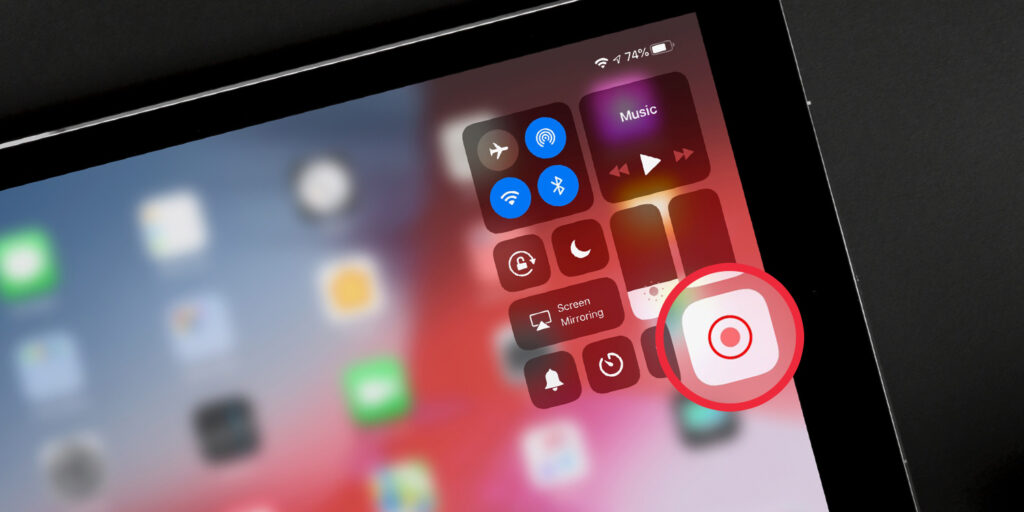
The following step is to go to the Control Center and enable the screen recording technology. On an iPad, you can do this by swiping down from the top-right corner of the screen.
To begin, simply tap the Screen Recording button (a circle within another circle). A countdown will begin, giving you time to leave the Control Center if you wish, and the icon will turn red once recording begins. A red icon in the top-right corner of the display also indicates the recording status.
When you’re finished, simply tap the red icon in the top-right corner (or the Control Center’s screen recording button) and then Confirm on the pop-up to end the recording.
To summarise:
- By going to Settings > Control Center > Customise Controls and tapping Screen Recording, you can add the Screen Recorder toggle to Control Center.
- Swipe down from the top-right corner of the screen to access the Control Center.
- To begin recording, press the Screen Recording button.
- To stop the recording, tap the icon again, or the red icon in the top-right corner of the screen.
How to Use a Voiceover to Record Your iPad Screen
It’s one thing to record your iPad screen, but what if you’re trying to walk a less tech-savvy relative through using a new feature? A voiceover would certainly help, and it’s also possible to do so using Apple’s built-in screen recording technology.
Also Read: How to play online games at work
To record a voiceover while recording the display, access the Control Center as before, but instead of tapping on the Screen Recording button to start the recording immediately, tap and hold the button.
A new menu should appear, with a toggle to enable your microphone available. To enable the functionality, tap the Microphone Audio button, and then tap Start Recording to begin your screen recording/voiceover combo.
You can stop the recording, as before, by tapping the red icon in the top-right corner of the screen, or by tapping the Screen Recording button in the Control Center.
To summarise:
- Swipe down from the top-right corner of the screen to access the Control Center.
- Hold the Screen Recording button down until a menu appears.
- To enable voiceover, tap the Microphone Audio button, and then tap Start Recording to begin.
- To stop the recording, tap the icon again, or the red icon in the top-right corner of the screen.
On my iPad, where are screen recordings saved?
When you finish a screen recording, it will be saved to your iPad’s Photos app.
You can then share the video via Messages, email, or social media, or save it to your PC or Mac to edit further.