Tricky Doors Walkthrough Level 1 cales. You came across a strange little book, and for some reason you felt compelled to begin writing in it. You were abruptly enveloped in a dazzling light as soon as the pen touched the page, and now you’re awake in a new cabin! The first level in the adventure game Tricky Doors, which features many challenging riddles, starts off in this manner. With the help of our Tricky Doors level 1 tutorial, you can return home.
Table of Contents
Complete Walkthrough For Episode 1 Of Tricky Doors
You wake up in the middle of an enigmatic cabin with no memory of how you got there. Finding a path home, in whatever form that may take, is your primary objective in this episode. You will pass through stunning landscapes on your voyage, so let’s begin the adventure.Tricky Doors Walkthrough Level 1 cales.
Part 1: Getting Out Of The Cabin
First things first, we’ll grab anything that isn’t fastened to the floor with bolts. Slide the screen downward to change your perspective. You can tap and drag the screen up and down. Grab the wooden Handle and Candle that you should see in the bottom left corner near the trapdoor.
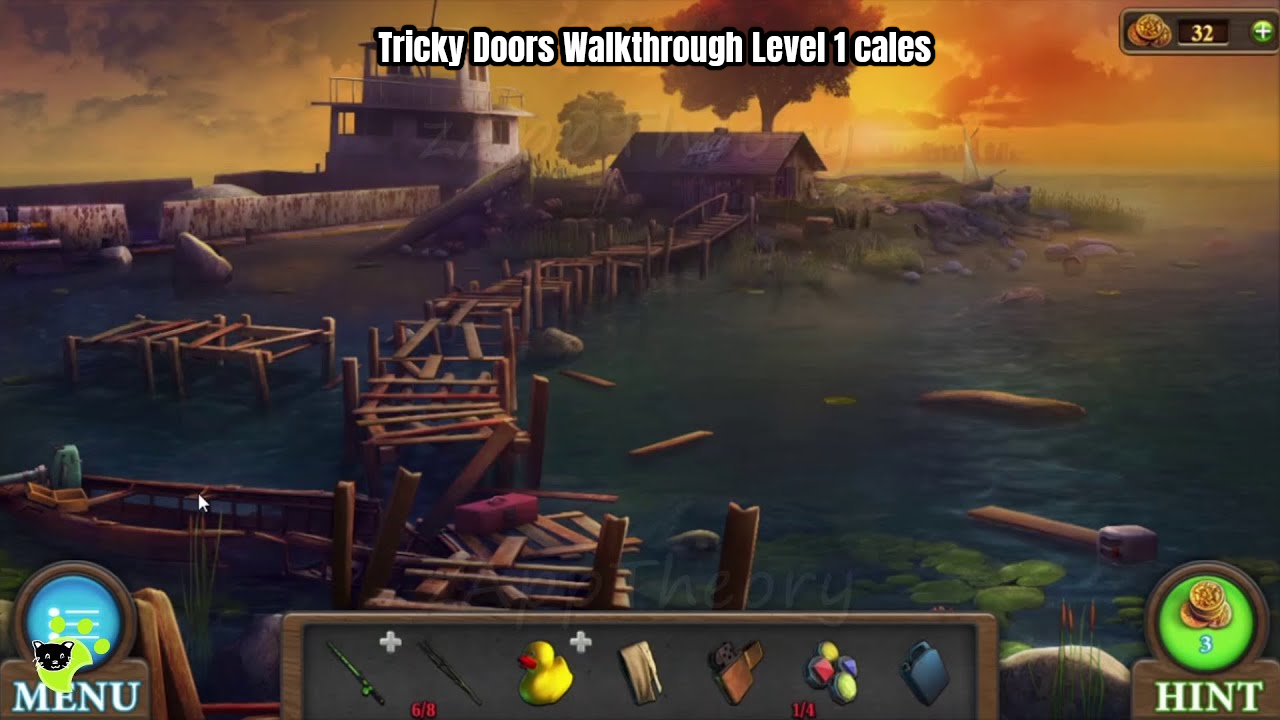
There is a fireplace in the centre of the space. Grab the Figured Key that is hanging on the fireplace’s back after taking a look inside. Grab the Ritual Knife and the Potion Recipe that are positioned above the hearth.
Tap on the eerie-looking mask on the wall to get a closer look by gazing to the right. Its right eye socket contains a red gem; tap on it to obtain a Ruby. A broomstick is located below the sinister mask.
To closely inspect the chest, tap on it on the room’s right side. Instead of tapping the chest again, look on the ground; there should be a Key with Balls there.Tricky Doors Walkthrough Level 1 cales.
On the left side of the room, look at the alchemy desk. You can find the Key with Monograms by reading the paper in the bottom right corner. From the bottom left corner, grab the straw doll.
We can basically only learn that from the beginning. Tricky Doors Walkthrough Level 1 cales.We must now put our thinking caps on and begin solving problems! We’re most likely going to a large trapdoor in the centre of the area, which needs four keys to open.
You ought to spot a cobweb in the room’s upper right corner, next to the unsettling mask. Use the Broomstick on it to obtain the Simple Key after tapping on it to study it closely.
A rope with some herbs on it is hanging over the alchemy workstation and to the left of the fireplace. Cut it with the ritual knife to obtain some rope. We can pretty much do nothing else here right now, so let’s leave.
Use the Figured Key, Key with Balls, Simple Key, and Key with Monograms to open the trapdoor that is in the centre of the chamber. To leave the cabin, descend.
Part 2: Gathering The Ingredients For The Potions
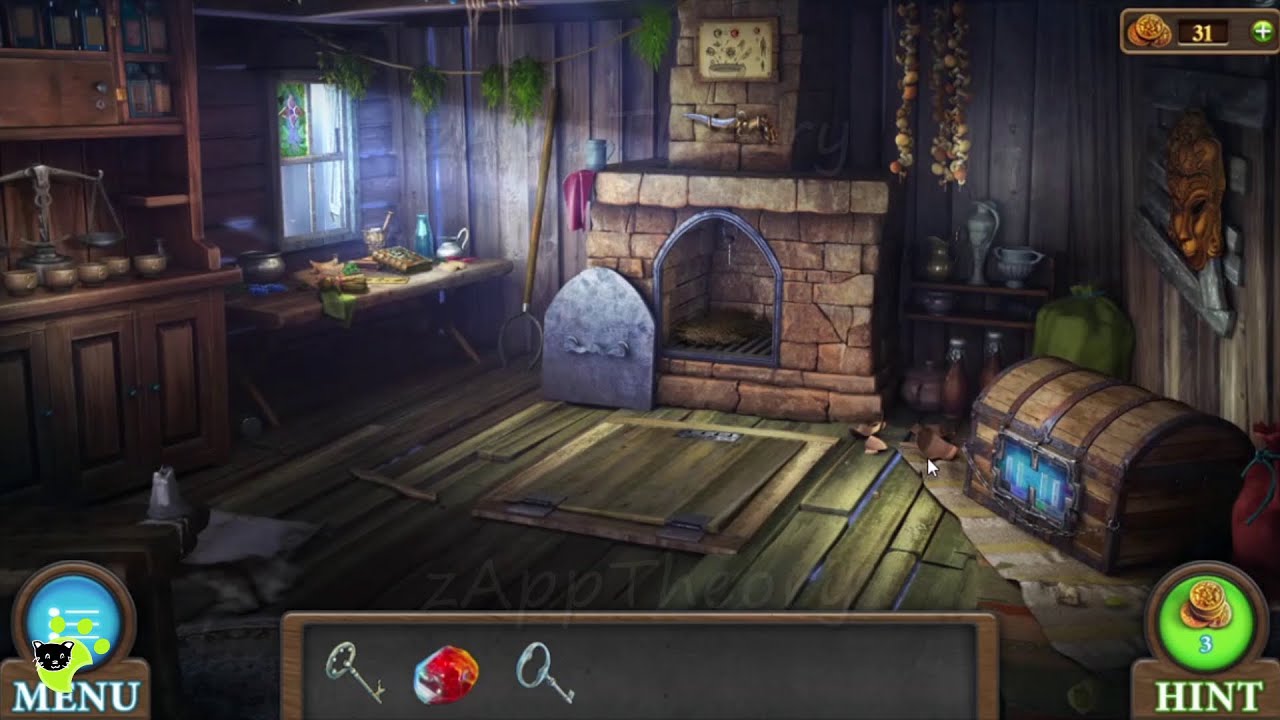
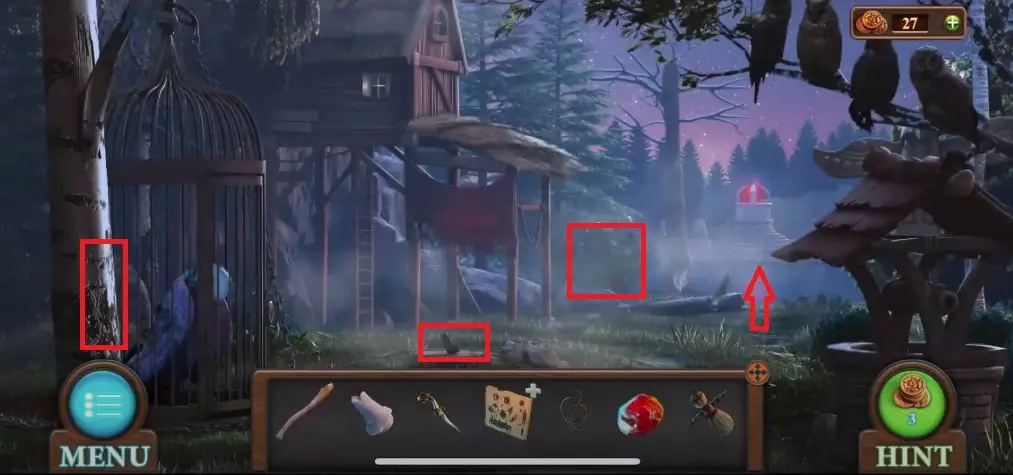
Right now, you’re in the centre of a stunning forest. Grab some berries from the bush to the right of the cabin’s ladder after inspecting it. Leave the berry bush and use the Ritual Knife to cut Birch Bark from the top of the tree adjacent to the bird cage. Inspect the stump, lower the screen, and gather the axe head and feathers in the grass.Tricky Doors Walkthrough Level 1 cales.
Use the Handle on the Axe Head in your inventory after inspecting it. Use the Ritual Knife to remove some extra wood so that the Handle may fit into the Axe Head’s hole completely.
To move the log, tap on the stump after tapping the pile of chopped logs to highlight it. Crush all the logs there with the repaired axe to obtain firewood.Tricky Doors Walkthrough Level 1 cales. Examine the four owls sitting on the branch in the top right corner after leaving the stump.
An eye’s eyes will glow if you tap on them. You should pay attention to whether the owls’ eyes are glowing red or yellow, starting with the one on the left and moving to the one on the right. Your order might be different from ours, which was red, red, yellow, yellow, red, yellow, red.
Tap on the far altar to approach it. It has an odd appearance and is releasing a red flame. Grab the Handle by the rock and lower the screen. Grab the Empty Cauldron on the ground to the left. Get a closer look at the lily pad with the pink bloom on it. Cut the stem off with the Ritual Knife and gather the Lily.
To collect mushrooms, use the Ritual Knife on the mushrooms sprouting from the totem near the right side of the screen. Take hold of the Arrow that protrudes from the totem’s side. Examine the face by tapping on the totem’s upper portion.
Put the Ruby in the totem’s left eye socket since the right one has a single yellow gem. You must repeat the order of the owls’ eye colours from previously since tapping on either gem will cause it to shine.
If you make a mistake, just hit the reset button at the bottom of the screen to start over. Grab the Crystal within the hidden chamber that will emerge from the side of the totem’s head if you tap the gems in the proper sequence.
revisit the altar’s perspective. Finish the work with your axe since the tree on the left has been nibbled through by beavers. You’ll be able to cross the river since it will fall down to the opposite side.
To view the altar from the top down, tap it. For a close-up, tap on the area with the flame. Then, use the Candle and the Doll on the flame to get a Burning Candle and a Smoking Doll.
Examine the snake to the left of the totem after leaving the altar. Grab the red Gem after scaring the snake away with the Smoking Doll. Return to the field in front of the cabin.
Inspect the well on the right side of the screen, and then fasten the Handle to one of its sides. Use the handle to hang the Empty Cauldron from the chain in the centre. To obtain a Key and a Cauldron of Water, tap the cauldron twice. Re-enter the cabin from the top.
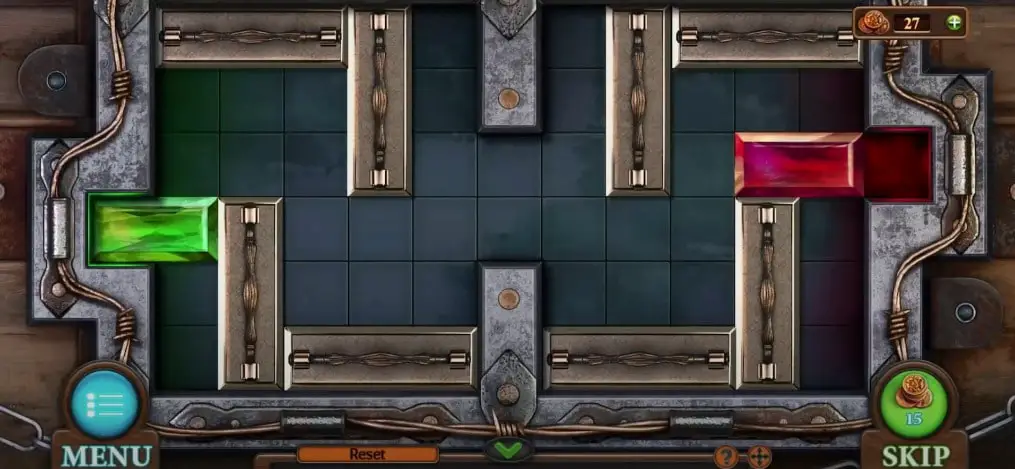
Double check the chest in the bottom right corner to see whether there is a puzzle inside. Put the red Gem in the open socket in the bottom left to turn off the magical force barrier that is blocking it.
Get the red and green gems into their appropriate slots—the red gem goes in the right slot, and the green gem goes in the left slot—in order to complete this task. Here are a few guidelines you should be aware of:
- You can move the green and red gems in any direction.
- While the vertical pieces can only move up and down, the horizontal blocks can only move left and right.
Here is a picture of the board when you are going to complete the puzzle to give you a sense of how the puzzle should flow:
Grab the Stick and Net because the chest will unlock if the gems are in the proper placements. To create a ready-to-use Bow, examine the Stick in your inventory and then combine it with the Rope, Arrow, and Feathers. Return to the altar River crossing after leaving the cabin.
A chest should be seen if you look closely at the lily pad that is afloat in the river. Use the net on the chest to get it, use the ritual knife to cut some seaweed off and gather it. To obtain a Bottle from the chest, use your Key to unlock it.
Look at the skinny tree that has the apple dangling from it. Shoot the Apple with your bow, then head back to the cabin.
Part 3: Entering The Micro-World
Look over the recipe scroll in your possession. To add an ingredient to the recipe, first choose it from your inventory, then tap the appropriate place on the screen. Ingredients are created when you combine Mushrooms, Berries, Lily, Seaweed, and ultimately Birch Bark.
Place the wood inside the fireplace after giving it a once-over. To set the firewood on fire, use the burning candle. After setting the water-filled cauldron on the hook, add the combined ingredients. Dip the Apple into the pink water to transform it into a Magic Apple.
Now look up at the window over the alchemy table. Placing the Crystal inside the tiny circle on one of the panels will cause a magic ray to shine upon the desk.
If you look at the alchemy desk, you’ll see that the tiny platform with the ladder is being illuminated by the magic beam of light. The Bottle will generate a magical field when it is placed on the platform. Eat the Magic Apple from the bottle to make it shrink, which will open the door for you.
A praying mantis is starring at you as you find yourself in the centre of a mushroom garden. You’ll need to figure out a means to get the mantis’s seal on the magic book.
Examine the web on the mantis’ left and make an attempt to attack it with your axe. You will receive the Handle back even if the Axe will break and break the head. Look over the Bow in your possession, then cut it with the Ritual Knife to release the Rope.
Look at the beetle husk that is next to the mantis. Use the Handle on it after breaking off its horn mandible with a tap. With the help of a sharp tool and rope, secure everything. return to the internet.
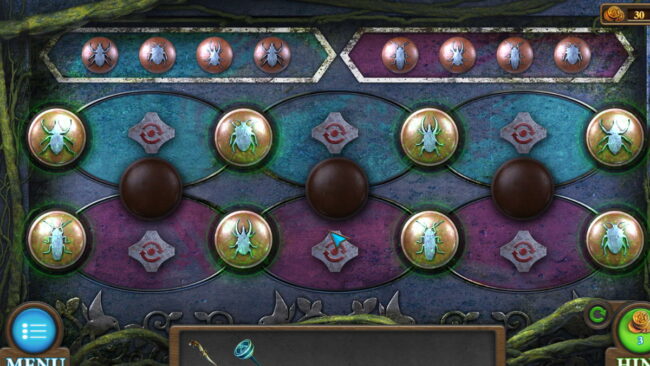
Cut it all down with the Sharp Tool on the site, then gather the Nymph. Tap on the background rock to study it now that the spider web has disappeared. The bottom of the two square indents will open to reveal another puzzle.
As seen in the diagram at the top, your goal is to match the insect marbles with their proper placements. The placements of the bugs must perfectly match those of the top row, which is the blue row, and the bottom row, which is the purple row. A stone will somewhat light up when it is placed correctly.
When the puzzle is finished, the top indent will pop up to expose a note with directions for growing the “Flower of Insight” outside the micro-world. The blossom must be extracted with a Golden Spatula, after which it must be planted in the ritual bowl’s ashes. Next to the note, seize the Golden Spatula.
On the right side of the screen, look at the cluster of odd eye-flowers. If you try to grasp one, it will shrivel up right away. You’ll need to dig up a Bulb with the Golden Spatula, just like the message said.
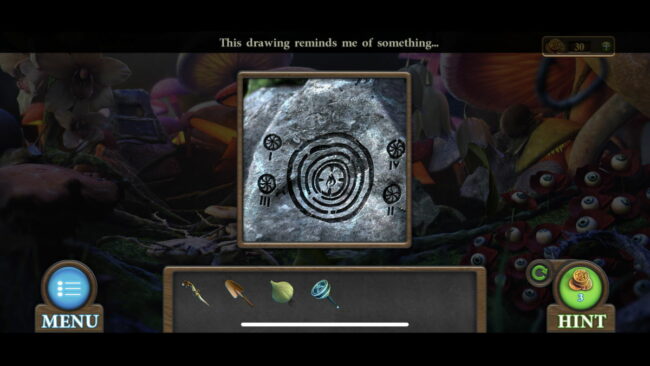
Get the Stamp by using the Nymph on the mantis. By removing the leaves covering the rock to the right of the mantis, you may see a diagram that resembles the ancient ceremonial altar.
Return to the sacred altar. You’ll see that you can now interact with the devices in the screen’s four corners. Tap them in the diagram’s order, from I to IV. Tap the middle to closely inspect it before the ritual flame goes out.
Dig a little crevice with the Golden Spatula, then place the Bulb there. The Flower of Insight will emerge right now, so seize it. Going back to the cabin
Part 4: Retiring
Look over the alchemy workstation before stamping the book with the skull. A blank page, an ink recipe, an amulet, and a key are all visible when the book is opened.
Use the weighing scale to inspect the cabinet above the desk. Grab the three Jars after using the Key to open the cabinet. Examine the weighing scale, then use the Ink Recipe to pin the recipe to the nail next to the screen’s left edge. Return to the bottle since you’ll need to acquire a number of ingredients once more.
Examine the large white orchid on the left and gather some dew in a Jar. Take a closer look at the white flower buds on the right side, then use a Jar to gather some pollen. The Ritual Knife should be used on the large stem in the foreground after you’ve examined the area where the web formerly stood. Orchid Juice can be collected using your last Jar.
Leave the cabin before we begin brewing the ink. Look at the bird cage on the screen’s left side. Use the Amulet to open the cage, but the bird is blind it seems. After giving it the Flower of Insight to regain its sight, recheck the cage to retrieve the Blind Bird’s Feather.
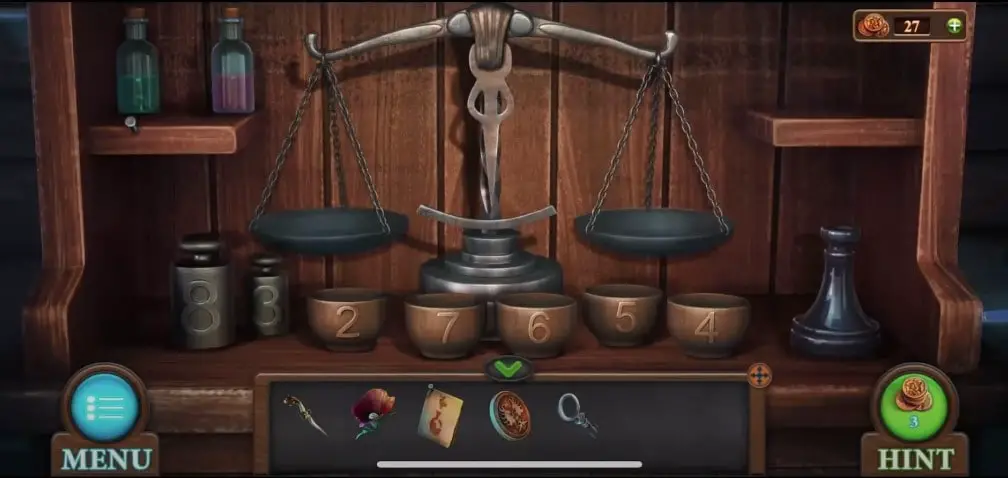
Examine the desk with the weighing scale when you return to the cabin. The puzzle will begin once all of the filled Jars are placed on the shelves. Your goal is to evenly distribute the amounts of each component as specified in the recipe.
We will guide you through this puzzle’s rules because they seemed unclear to us. Starting with the red bottle, which equals 5, let’s move on. Consequently, place the 8 weight on one side, the 5 bowl, and the 3 weight on the other.
Now that both sides of the scale equal 8, you can pour the red bottle into the 5 bowl to balance the scale. It’s now only a matter of doing some easy math using the weight of the filled 5-bowl as a reference. For your convenience, here is a short reference:
- Dark green bottle: 2
- Pink bottle: 7
- Blue bottle: 6
- Red bottle: 5
- Light green bottle: 4
Each ingredient will be automatically poured into the bottle on the right side of the desk once you have accurately weighed it out. You can get Magic Ink by tapping on the bottle.
Place the Magic Ink on the alchemy workbench after inspecting it. Tap on the book after using the Blind Bird’s Feather on the Magic Ink to make the connection to reality. Congratulations, you’ve finished Tricky Doors’ first episode!
Our Tricky Doors level 1 walkthrough has come to an end. Please share any further queries or advice in the comments section below.