How To Draw Easter Bunny Step By Step. There are many ways to draw Easter bunny images, but here's one approach you could try:
Table of Contents
Materials needed
- Pencil
- Eraser
- Paper
- Colored pencils or markers (optional)
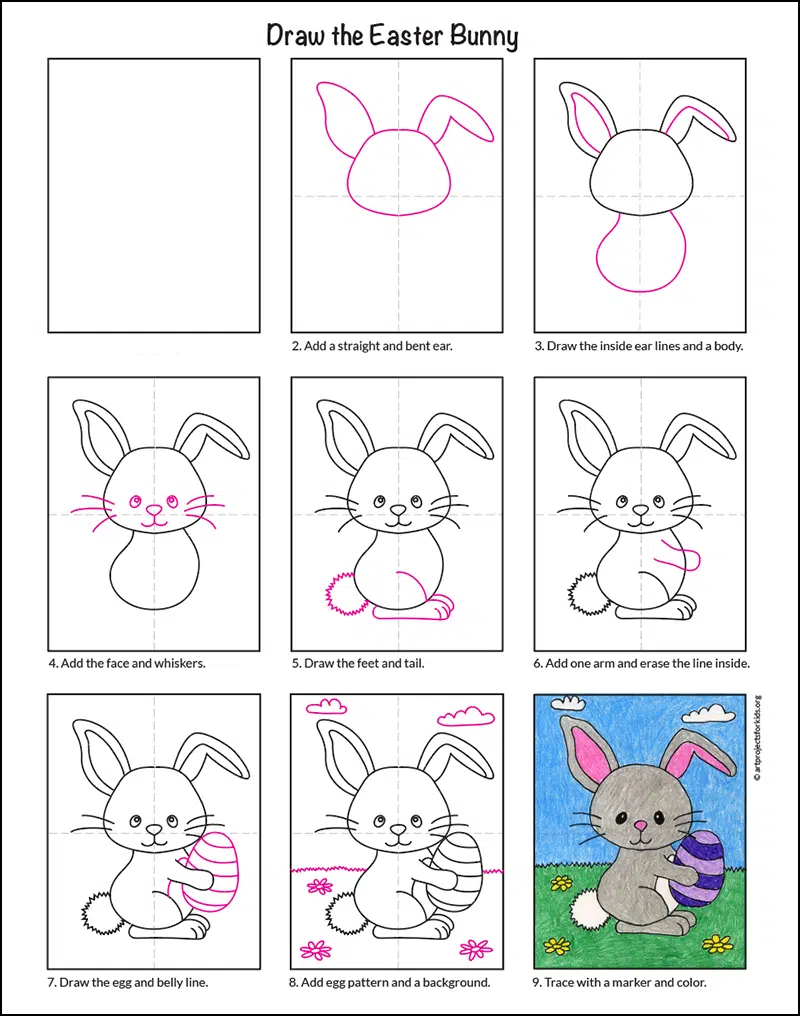
How To Draw Easter Bunny Step By Step
Learn More: Sister Act 3 Release Date Australia
- Start by drawing a large circle for the bunny's head. Add two smaller circles on top of the head for the bunny's ears.
- Draw a smaller circle inside the larger one for the bunny's nose. Add a curved line below the nose for the mouth, and draw two small circles for the cheeks.
- Draw two ovals for the bunny's eyes. Add two small circles inside the ovals for the pupils.
- Sketch two curved lines extending from the bottom of the head for the bunny's body. Add two curved lines at the bottom for the bunny's feet.
- Draw two large ovals for the bunny's arms, and add two smaller ovals at the end of each arm for the paws.
- Sketch the bunny's fur by adding small lines all over the body. Add some more details, like a bow or basket, if desired.
- Once you're happy with your sketch, go over the lines with a pen or marker. Erase any pencil lines that are no longer needed.
- Finally, color in your bunny with colored pencils or markers if desired.
Remember that this is just one way to draw an Easter bunny, and there are many variations you could try. Have fun experimenting with different styles and techniques!
FAQ
How To Draw Easter Bunny Step By Step?
- Start by drawing a large circle for the bunny's head. Add two smaller circles on top of the head for the bunny's ears.
- Draw a smaller circle inside the larger one for the bunny's nose. Add a curved line below the nose for the mouth, and draw two small circles for the cheeks.
- Draw two ovals for the bunny's eyes. Add two small circles inside the ovals for the pupils.
- Sketch two curved lines extending from the bottom of the head for the bunny's body. Add two curved lines at the bottom for the bunny's feet.
- Draw two large ovals for the bunny's arms, and add two smaller ovals at the end of each arm for the paws.
- Sketch the bunny's fur by adding small lines all over the body. Add some more details, like a bow or basket, if desired.
- Once you're happy with your sketch, go over the lines with a pen or marker. Erase any pencil lines that are no longer needed.
- Finally, color in your bunny with colored pencils or markers if desired.