The world in “The Legend of Zelda: Tears of the Kingdom” (TotK) is enormous and gorgeous. There is so much to see and appreciate that there may be times when you wish you could take a picture of everything to show friends or to look at later. In fact, the game contains a camera feature that enables users to capture images of Link as he explores Hyrule, including selfies.
What to Photograph in Tears of the Kingdom?
You may access the camera in TotK and learn how to capture images using the instructions in this guide.
Table of Contents
Tears Of The Kingdom How To Take Pictures
If you’re referring to the phrase “Tears of the Kingdom” as a concept or theme for taking pictures, here are some general tips on capturing emotionally evocative or storytelling images:
- Understand the Concept: Explore the theme of “Tears of the Kingdom” and what it means to you. Think about the emotions, narratives, or visual elements associated with it. This will guide your approach to capturing the essence in your photos.
- Composition: Pay attention to the composition of your images. Use the rule of thirds, leading lines, and framing techniques to create visually appealing and engaging photographs. Experiment with different angles and perspectives to tell your story effectively.
- Lighting: Lighting is crucial for setting the mood and conveying emotions. Consider the time of day and the quality of light available. Soft, diffused light can create a gentle and emotional atmosphere, while harsh light can evoke drama and intensity.
- Focus on Emotions: Look for moments that evoke strong emotions related to your concept. Observe people’s expressions, body language, and interactions. Capture candid moments that reflect joy, sadness, contemplation, or any other emotions that resonate with your theme.
- Use Depth of Field: Experiment with shallow depth of field to isolate your subject and create a sense of depth and focus. This technique can draw attention to specific details or emotions within the frame.
- Storytelling: Tell a story through your images. Look for details, symbols, or actions that can communicate the narrative behind the “Tears of the Kingdom” concept. Think about the context, characters, and plot that you want to convey visually.
- Editing: Post-processing can enhance the mood and atmosphere of your photos. Experiment with different editing techniques, such as adjusting contrast, saturation, or applying specific filters or tones to match your intended emotions.
- Practice and Experiment: Taking powerful and emotionally charged photographs requires practice. Take your camera with you wherever you go and continuously challenge yourself to capture different aspects of the “Tears of the Kingdom” concept. Don’t be afraid to experiment and try new techniques.
Remember, the interpretation of the phrase “Tears of the Kingdom” can vary, so adapt these tips to your personal understanding of the concept to create meaningful and impactful images.
Obtaining a Camera
Getting the in-game camera is the first step towards taking images of Hyrule. You must finish the mission “Camera Work in the Depths” to accomplish this. Immediately after completing the tutorial and turning on the Lookout Landing tower, the task becomes accessible.
How to access the quest is as follows:
Head to Lookout Landing after completing the lesson and receiving your paraglider.
- Speak with Purah Robbie
- After you’ve finished speaking with her, you’ll hear Josha, one of her students, mention someone by the name of “Goggles.”
- Josha will lead you underneath the lab.
- Josha should acquire a red exclamation mark over her head once she has connected with Robbie (Goggles), indicating that she has a task for you. To begin the mission, speak with her.
You’ll find out after speaking with Josha and Robbie that Josha wants to descend into the shadowy depths below, but Robbie won’t let him. He suggests that he and Link go down there as an alternative.
Robbie will offer to meet Link at the nearby Jionsin Shrine, which is the Hyrule Field Chasm. You can fast-travel there to complete the process faster since you could already have unlocked that shrine. In every other case, you’ll need to walk there.
The measures to do in order to finish the quest are as follows:
- Enter the chasm once you’ve arrived there, then use your glider to land on the level below.
- Meet Ponnick, who will inform you that Robbie has vanished.
From campfire to campfire, you’ll need to follow Robbie’s footprints while referring to the notes he left behind. - Keep moving west and brighten up the shadowy locations with your arrows by using Brightbloom Seeds.
- Along the way, you’ll have to take on some Bokoblins, but finally you’ll reach the Iayusus Lightroot and meet up with Robbie.
- Robbie will show you how to operate the camera, and you’ll need to take a photo of a nearby statue to demonstrate your photographic prowess.
- To complete the mission, quickly return to Lookout Landing and provide Josha with your picture.
Use of the Camera
After finishing “Camera Work in the Depths,” you can continue using your camera throughout the rest of your journey in TotK. You will receive a quick training on how to use the camera as part of the quest; in case you need a reminder, the instructions are provided below:
- Similar to Ultrahand and Ascend, the camera functions as an ability. You must therefore press and hold the “L” button to display the ability wheel in order to access it. With the help of the right stick, choose the camera icon, then release “L” to exit the menu.
- To aim your camera, use the right stick. The arrow buttons allow you to zoom in and out, which might help you capture close-ups or larger shots.
- When you’re satisfied with how it appears, click the “A” button to take a picture.
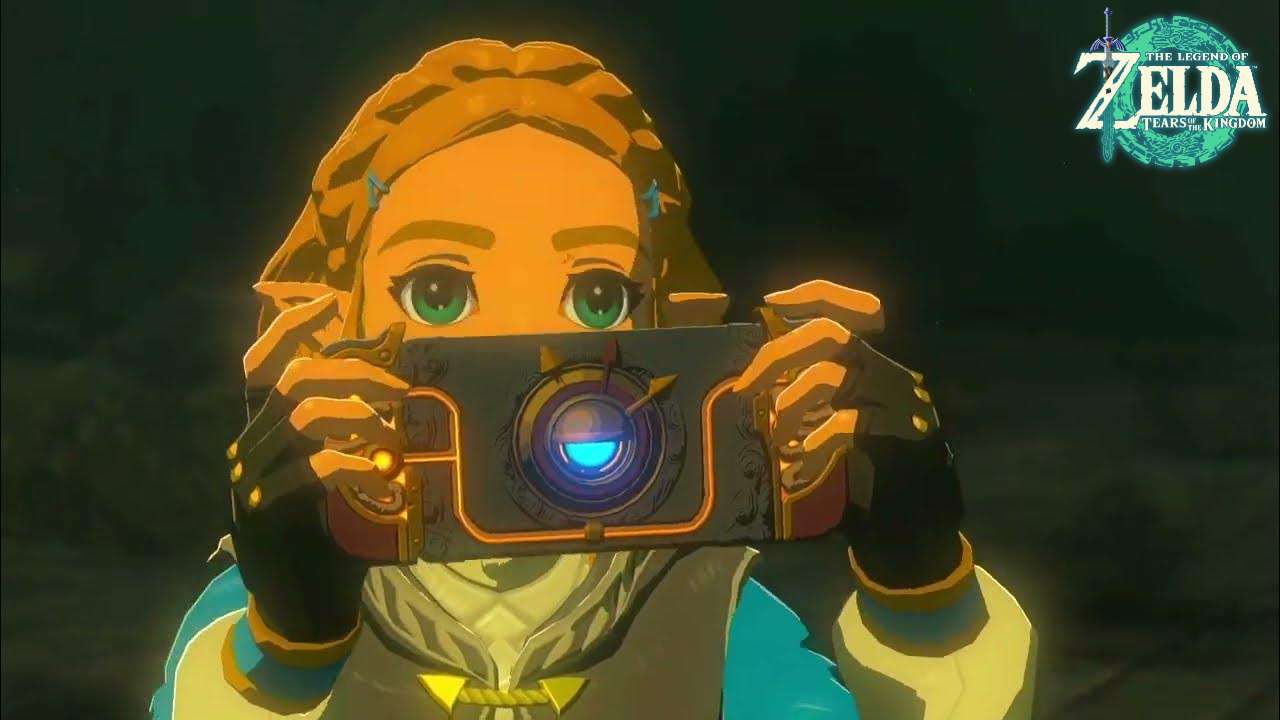
- The camera allows you to capture selfies as well. Bring out the camera as usual to accomplish this, then hit the “X” button to enter selfie mode, or “Self-Portrait Mode,” as the game refers to it.
- Before pressing “A” to snap the picture, gain, use the arrows to zoom in.
- Move the left stick when Link is in selfie mode to get him to strike a pose.
How to Take Screenshots in TotK
You can snap images while playing TotK without using a camera. The Switch’s built-in “Capture” feature, which lets you take screenshots of the screen or even record brief gameplay videos (up to 30 seconds long), may also be used to take screenshots.
At any time while playing, press the “Capture” button on your Switch to take a screenshot. On most Switch models, the “Capture” button is located under the “+” Control Pad; on the Switch Lite, it is located on the left Joy-Con. You may examine your screenshots by selecting “Album” from the “Home” menu.